New Kitchen, the Paleo Experiment, & the Best Roast Chicken


New

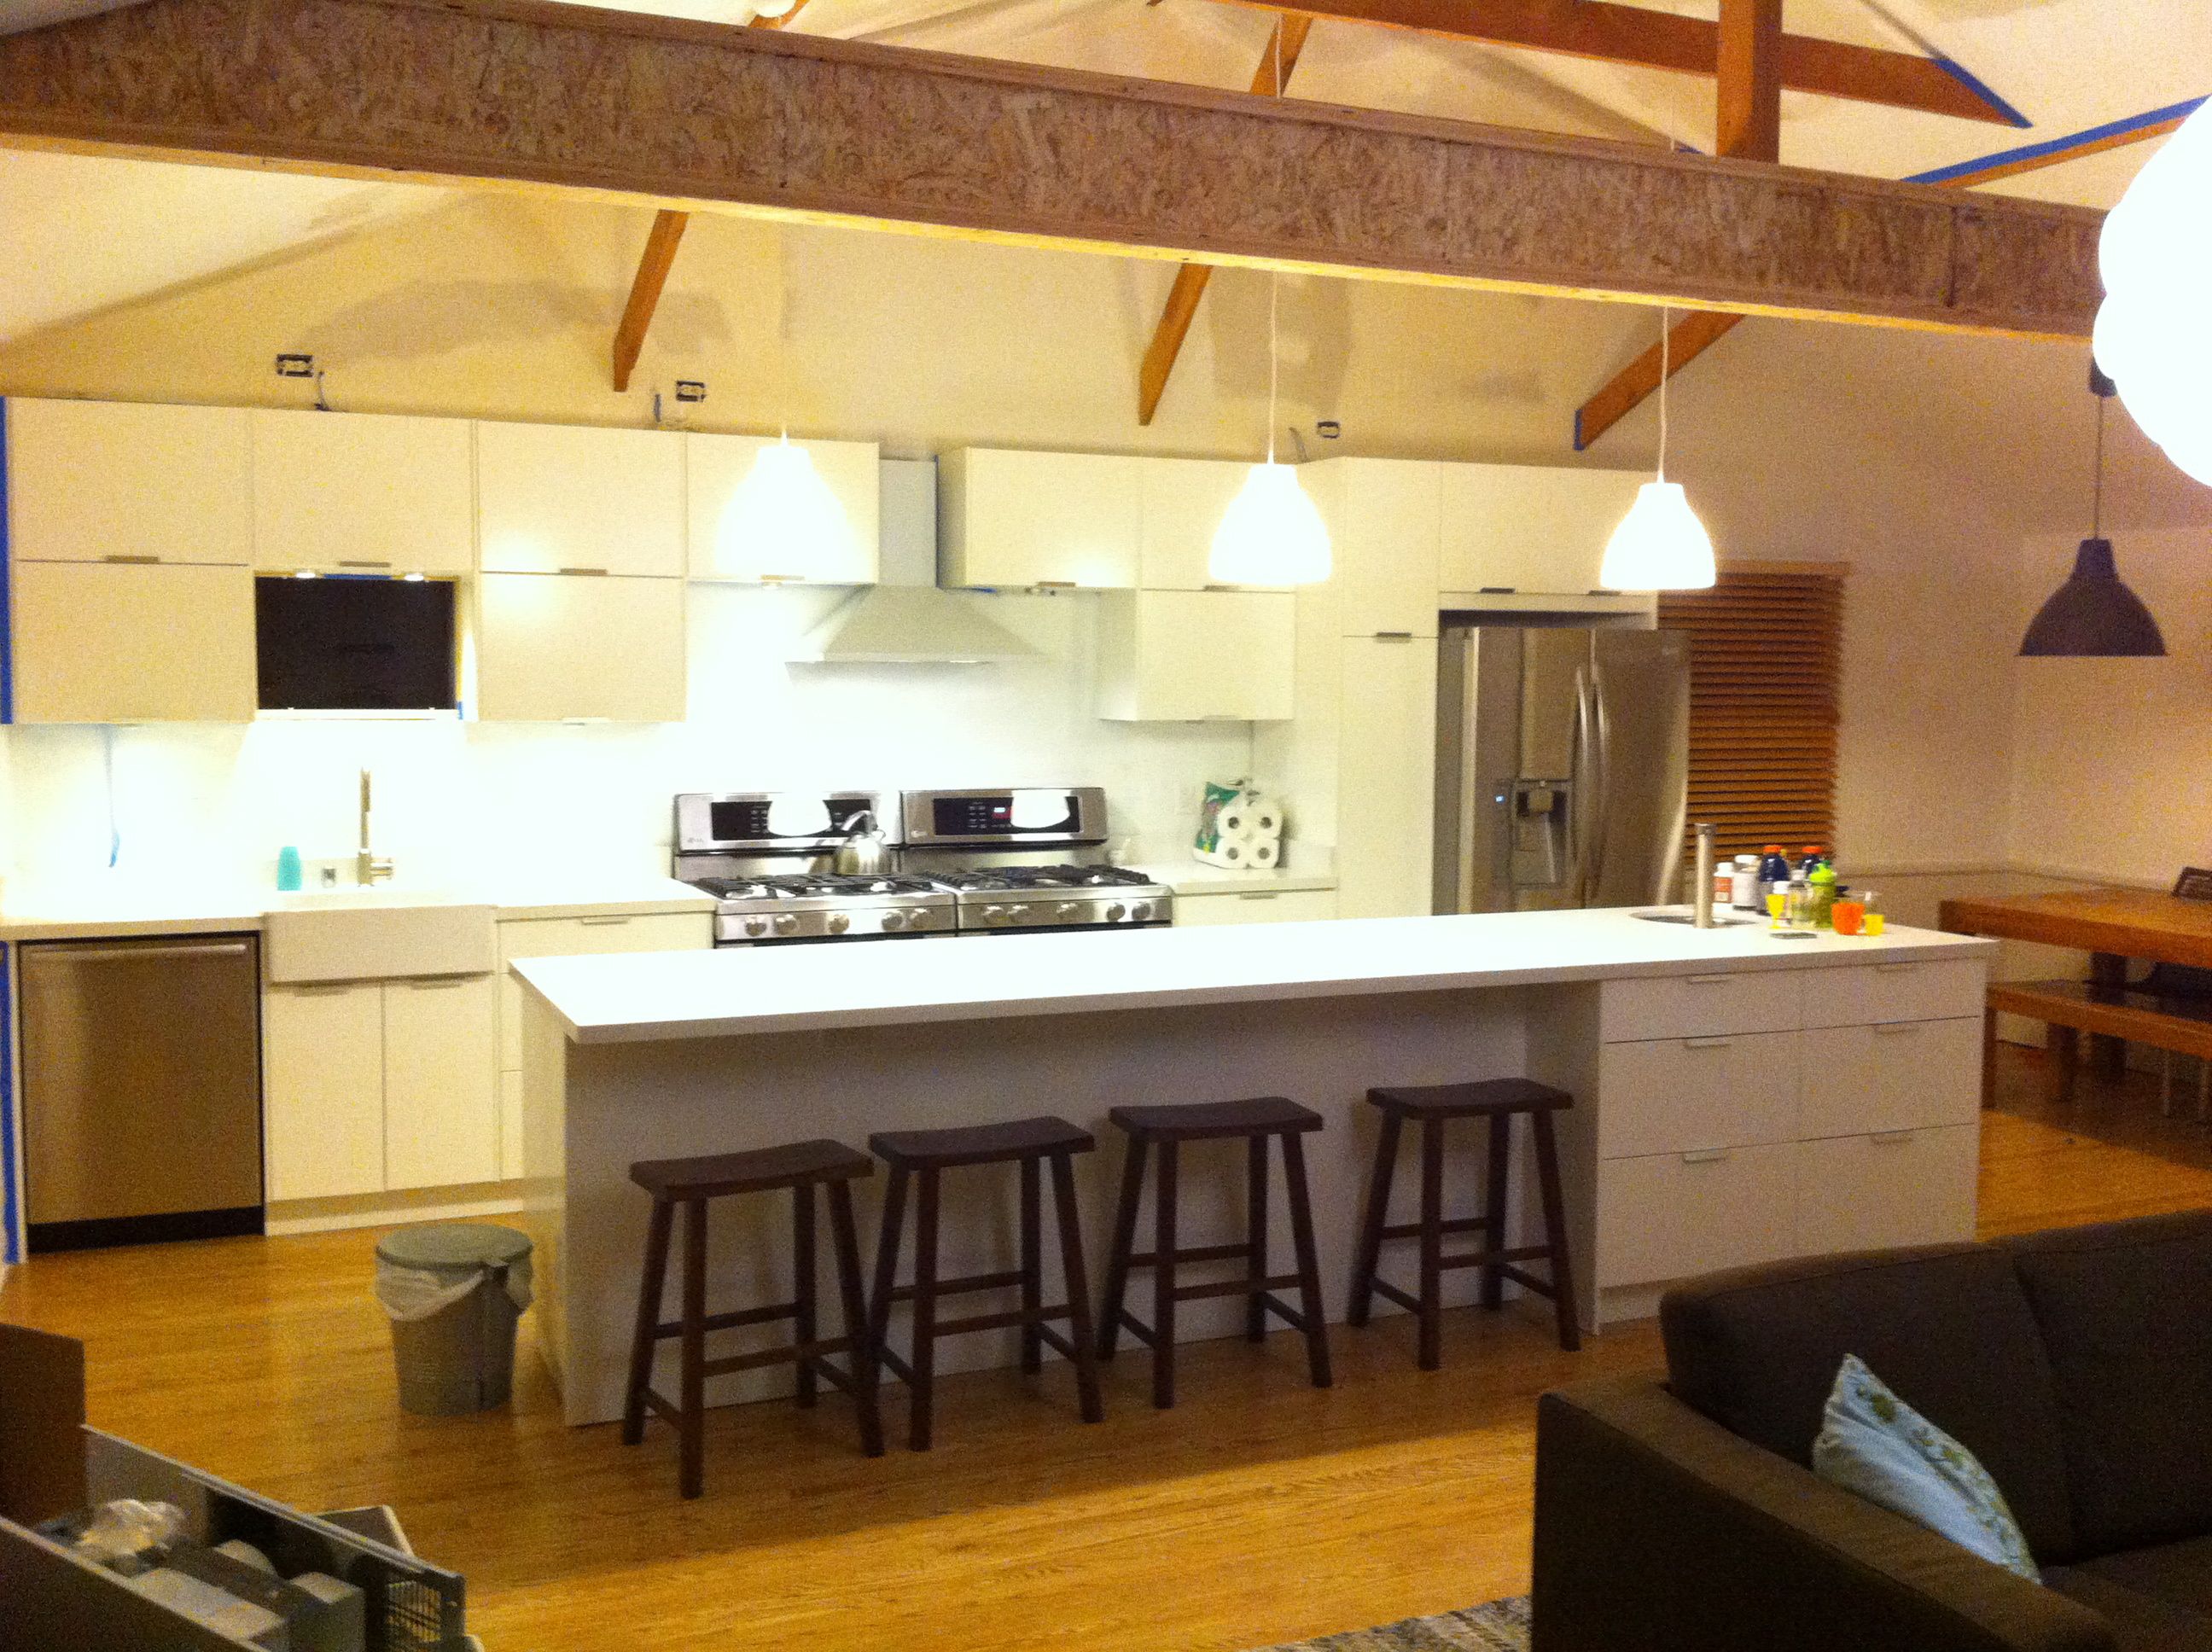
The tiny cook is back and I have a lot to talk about.  First, drum roll please…I have a fabulous new kitchen!  I’d like to thank Ikea for making affordable cabinetry and Home Depot for dealing with my price haggling on my 2 ranges (with 2 warming drawers).  I am so grateful for the new hub of our house.

Old

Old kitchen

What have I been cooking in my new kitchen?  Well, I’m glad you asked because I have been cooking up a storm over the holidays and now I’m ready for a healthy start to the New Year (aren’t we all?)  After hearing so many wonderful things about the Paleo diet, I decided to give it a try for 30 days to cleanse my body of all the wine and cheese I ate over the holidays.  Let me first say that as someone with a foodie heart, I do not plan on sticking with this way of eating for the rest of my life.  For me, this is a way for me to create some new, healthy eating habits and it’s a fun food challenge.  What is Paleo?  To sum it up, eat like the cavemen used to eat: each meal should include a palm size piece of organic protein (pastured and/or grass fed is best), 2 thumb sized knobs of fat (ghee, olive oil, & coconut oil are good), and the rest of your plate should be filled with veggies.  No dairy, no grains of any kind, no legumes.  You can read more details about it here.

I have just finished the first week and so far I feel pretty good.  No withdrawal headaches or crazy cravings.  I haven’t felt that bloated feeling you feel after eating a giant bowl of pasta, but besides that, nothing earth shattering.  The 3rd and 4th weeks I’m supposed to feel “Tiger Blood” – a huge energy boost that is supposed to come along with clear skin.  I’ll keep you posted on that.  For now, here is a list of things I ate for the first week:

Week 1

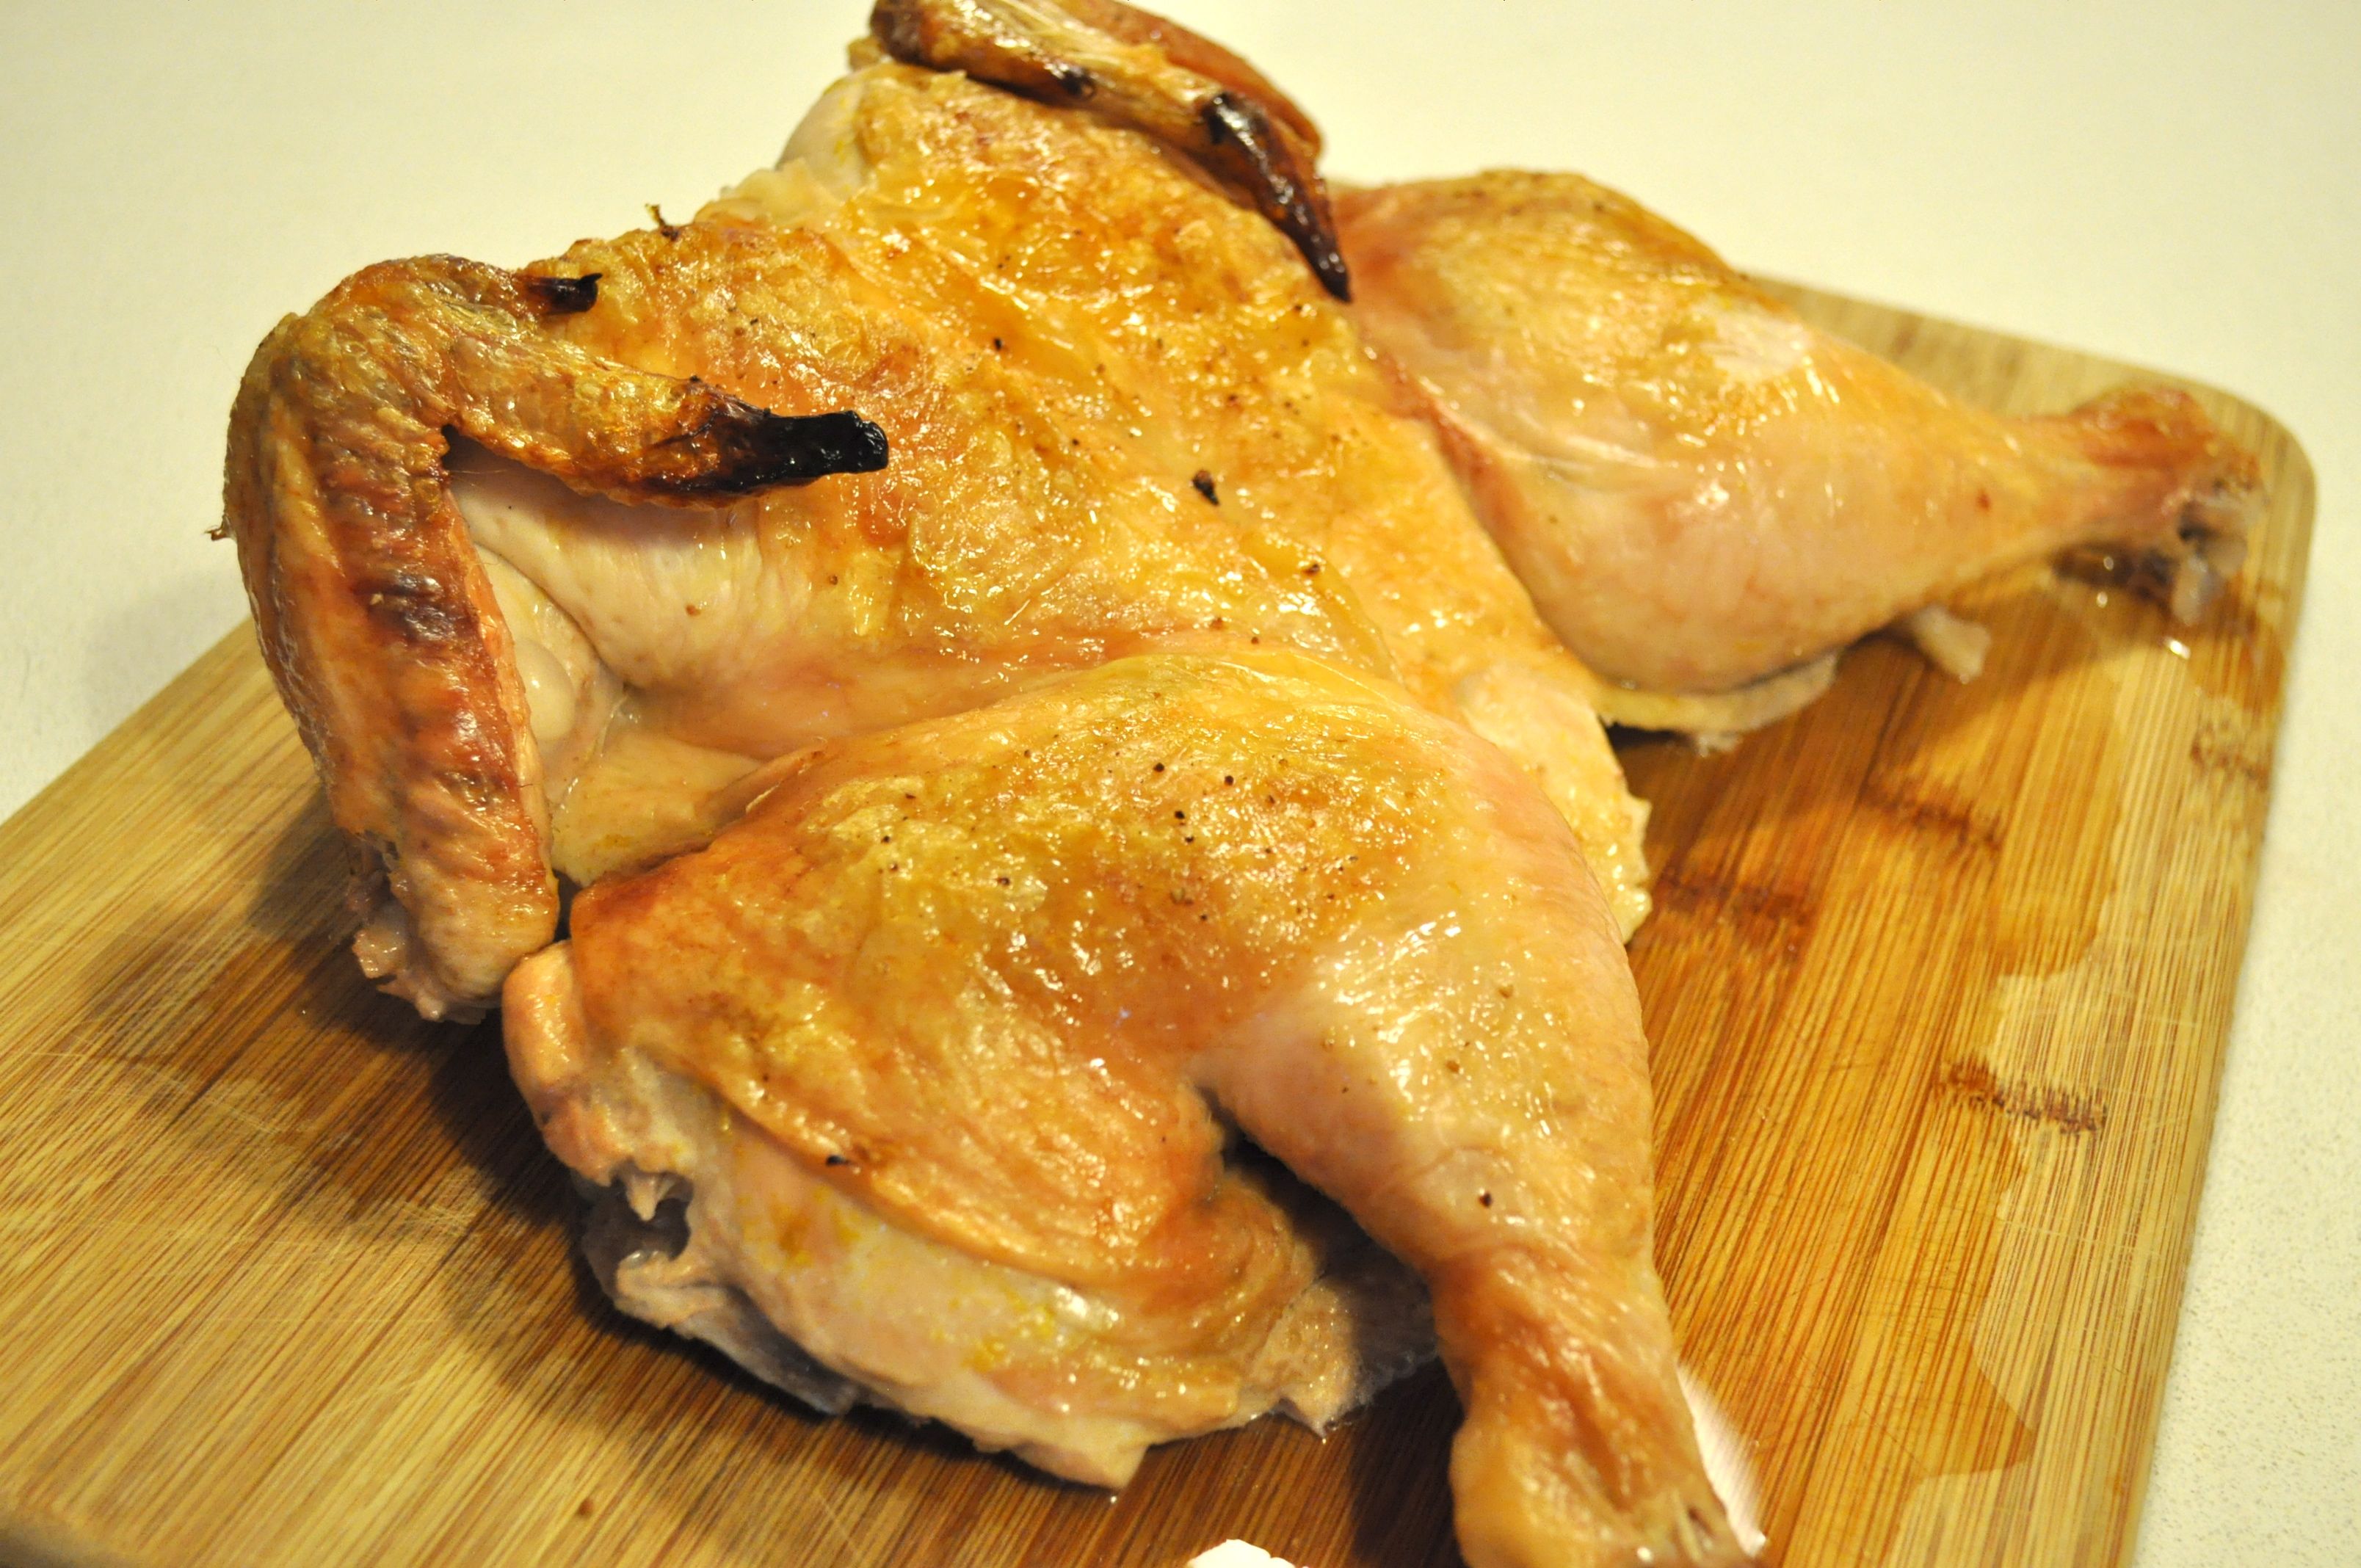
The first recipe I’d like to highlight is Lemon Roast Chicken, which is incredibly satisfying and cooks fast enough to make it weeknight material.  This recipe is a must-try.

ChickenBefore

Lemon Roast Chicken

This recipe is adapted from Cook’s Country

1 (4-5 pound) whole chicken, backbone removed (save this in your freezer to make stock later), and butterflied (*this can be done the night before)

3 Tablespoons grated zest, plus 1/3 cup juice from 2-3 lemons

(*Note – I used Meyer lemons because that’s what’s growing in my yard, but you can use regular lemons, you just might want to add 1 tsp of sugar to the zest)

Salt and Pepper

2 cups chicken broth

1 cup water

1 – Adjust oven rack to middle position and heat oven to 475 degrees.  Pat chicken dry with paper towels.  Combine lemon zest and 1 tsp salt.  Rub 2 Tablespoons zest mixture under skin of chicken (breasts and legs).  Season chicken with plenty of kosher salt and some pepper and transfer to a small roasting pan or a 9x 13 cake pan.  (If the pan is too big, the liquid will evaporate and burn your pan – trust me, it happened to me).

2 – Whisk broth, water, lemon juice, and remaining zest mixture together and add it to the roasted pan.  (The liquid should just reach skin of thighs.  If it doesn’t, add enough water to reach the skin.)  Roast until skin is golden brown and thigh meat registers 170 to 175 degrees, about 40 minutes.  Transfer to cutting board and let rest for 20 minutes.

3 – Eat the delicious, crispy skin and then carve and enjoy!  A 5 pound chicken feeds my family of 4 for dinner, plus I have plenty of leftovers for sandwiches and chicken salad all week long.

*You can make a light gravy with the juices and some cornstarch, but I find the jus in the pan so flavorful by itself.

Roast

*Another goal for the New Year is to learn to take better pictures for the blog.  Be patient with me.  They are coming.

*Also, I have a Facebook page now, so “Like” me on Facebook if you want to be notified in your news feed anytime I have a new post.  Or you can sign up for e-mail subscription on the right hand side of my homepage.  Thanks for your support and happy cooking and eating!

L’appetito e la salsa piu buona che ci sia. 

“Appetite is the best condiment there is.”

-Italian Proverb

Tiny Cook on hiatus…New Kitchen coming!

This tiny cook is taking a blogging break while I have no kitchen for a couple of months.  But very soon I will have a brand *NEW*  kitchen with 2, count ’em 2, ranges!  And warming drawers, and a dishwasher, and a prep sink, and did I mention the 12 foot island?  Yes, I am one grateful tiny cook:)  So I will be back to blogging about yummy things that will make your stomach growl, in about another month or so.  In the meantime I’m going to revamp the website to make it look a bit better.   Until then, Eat Well and Prosper!

30 Clove Garlic Soup

Got the sickies?  I recommend making a big batch of this soup to freeze for when you are sick and need soup to make you all better.  This soup is so velvety and delicious that I eat it even when I’m not sick.  I came across the recipe from Whole Living Magazine a few months ago.  Here it is:

Ingredients:

2 heads garlic, halved crosswise

1 tablespoon extra-virgin olive oil

4 cups low-sodium chicken stock

8 ounces Yukon Gold potatoes, peeled and chopped

1/4 cup freshly grated Parmesan, plus more for serving

Coarse salt and freshly ground pepper

Directions:

1 – Heat oven to 375 degrees. Drizzle garlic heads with oil. Wrap tightly in foil and roast until tender, about 40 minutes. Let cool, then squeeze garlic from papery skin and set aside.

Before

After

2 – Bring stock, potatoes, and roasted garlic to a boil; reduce heat and simmer until potatoes are tender, about 12 minutes. Remove from heat and stir in Parmesan.

3 – Let cool slightly, then puree in a blender until smooth. Season with salt and pepper. Sprinkle with Parmesan and serve with rustic bread.

There are two secrets to this recipe: 1 – You must use Yukon Gold potatoes – I tried using russets and it was not as creamy. 2 – Store bought chicken stock is fine, but homemade chicken stock, in this recipe particular (since there are so few ingredients), really takes it up to another level.  I was also thinking some crumbled bacon on top would be extra delicious.  Enjoy the garlicky goodness of this soup!

The Best Blueberry Muffins in the World!

I’m not kidding people.  These are the absolute best blueberry muffins in the entire world.  The secret?  Baking powder – and lots of it.  I should mention that these are not your typical blueberry muffins.  They are light and cake-like and not uber-sweet.  My mom always made these when I was a kid, although I have no idea where she got the recipe from.  These days I’m making them with my skeleton-pajama-wearing-mini sous chef, who likes to stuff her face with blueberries while whipping these up.

Here is the recipe:

Slavinsky Blueberry Muffins

Makes 12 muffins

Batter

½ cup granulated sugar

¼ cup butter, at room temperature

1 egg

2 ¼ cups all purpose flour

4 teaspoons baking powder

½ teaspoon table salt

1 cup milk

1 teaspoon vanilla extract

1 ½ cups rinsed and drained fresh blueberries (frozen work very well too)

Topping

½ cup granulated sugar

½ teaspoon cinnamon

1/3 cup all-purpose flour

¼ cup cold butter (cut into small pieces)

1) In a mixing bowl, cream together the sugar and butter until fluffy.  Beat in the egg.

2) Mix together the flour, baking powder, and salt in a separate bowl. (I like to do this a a day ahead so things come together quickly in the morning)

3) Add the dry ingredients to the sugar-egg mixture alternately with the milk, beginning and ending with the flour mixture.

4) Add vanilla and beat well.  Gently fold in blueberries.  Scoop into 12 muffin cups lined with paper liners.

5) In a small bowl, mix sugar, cinnamon, flour, and butter with your fingers, until crumbly (you can do this a day ahead and keep in the fridge).

Sprinkle over muffins.  Bake in a 375-degree oven for 18-20 minutes or until golden brown and a toothpick inserted in the center comes out clean.  These are best eaten the day they are made – they are still good the next day, the streusel topping will be softer though.  Oh streusel topping, how I love you.